Jeff Harper
Although a Masscar member for the past few years, most know me for being associated with the Cape Cod Scale Modelers club, where I am part of a core group that still meets regularly. My location keeps me from attending most Masscar meetings ( about an hour away ) but I do thoroughly enjoy the ones I am able to get to.
I build mostly antique trucks and related equipment, usually weathered to present the condition one would find the actual vehicle in on the jobsite. I am a true blue member of the Bowtie Brigade, and am on a mission to build a GM truck from every decade, from the very beginning in the teens to modern times. With a few exceptions, I typically do not build anything later than the 1970's, nor anything outside of the 1/25-1/24 scale world.
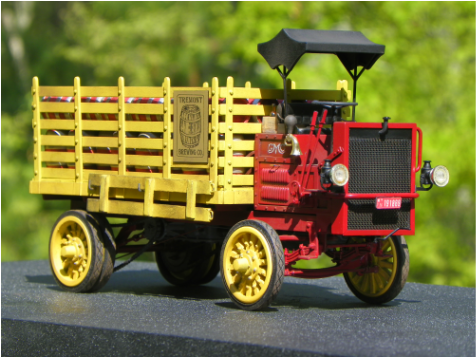
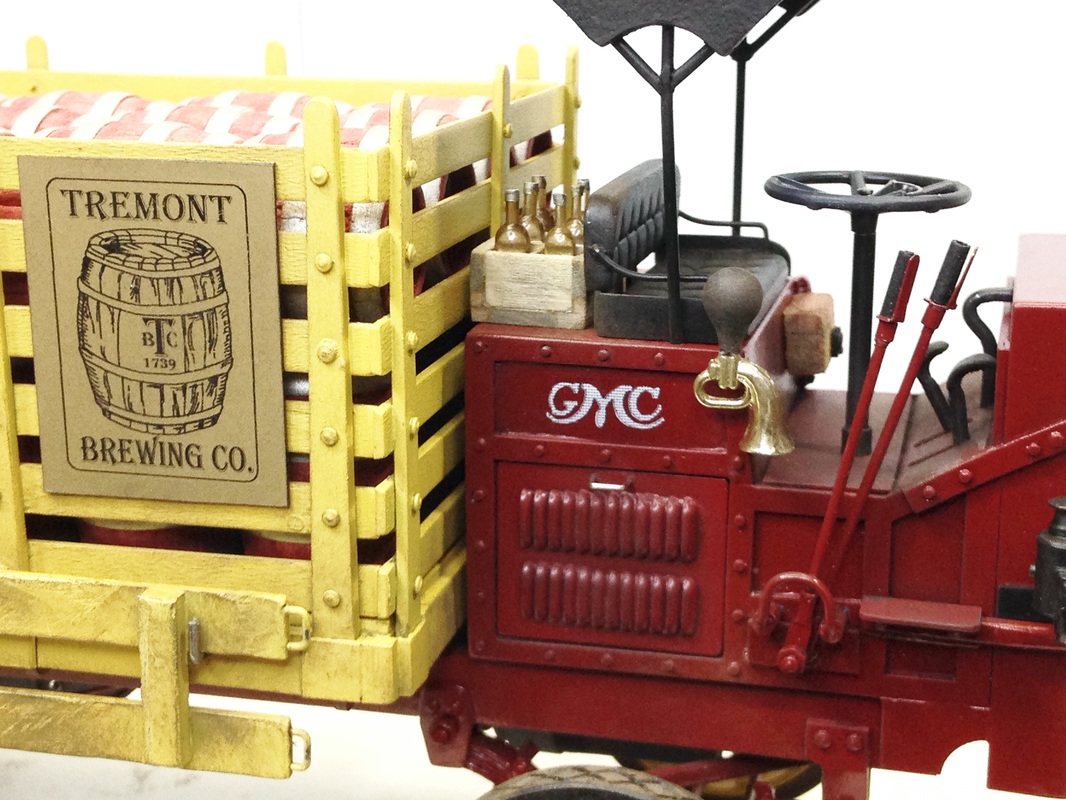
1911 GMC Model KL 5 Ton Brewery Truck
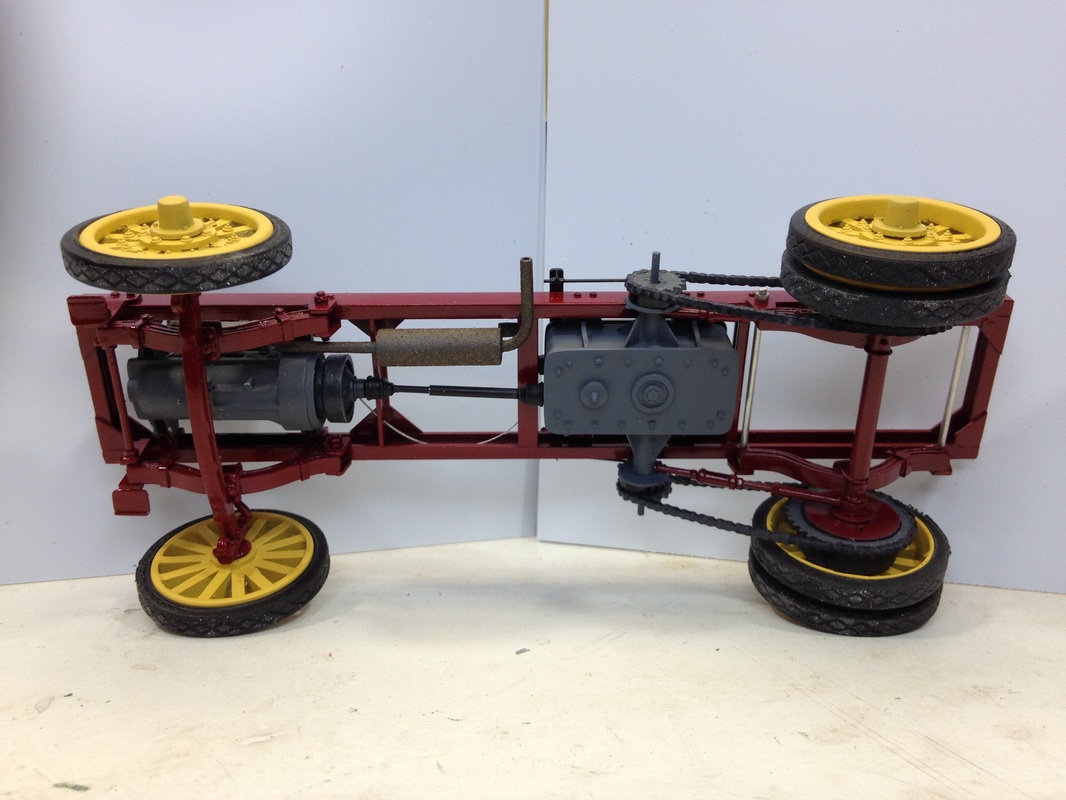
This is the FIRST truck ever to wear the GMC logo, and was basically a re-badged Reliance truck. I made use of the rims I had mastered for my back dated Mack kit and used the rubber from the Monogram kit, as were the axles and the chains. The frame and running gear were scratchbuilt, as were the springs and braking system.
The rack body uses selected parts from the Mack kit also, but were modified to double the amount of horizontal boards. Of course the entire cab is scratchbuilt, using photos and brochures to gauge the size and location of the major parts. The support structure for the
top is made of brass rod for strength, and the canvas top is styrene, textured with black paint. The rims and the rack body were painted with Valspar semi-gloss Maize Yellow, while the rest of the truck is regular old Krylon red. A very light treatment of weathering was done to give the model the look of a working vehicle.

1933 Boulder Dam Mack AP Mixer
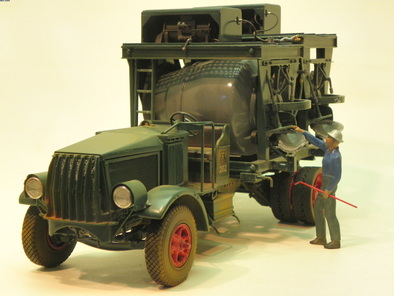
One of my more recent build is this historic Mack truck, used in the construction of the Boulder Dam. It was actually part of a challenge, where I and another modeler built two different trucks from the time the dam was built. He built the dump truck and I built the double barrel mixer you see here.
The Boulder Dam Mack was mostly scratchbuilt, with very few (modified) parts were used from the Monogram Mack AC kit. Scratchbuilt parts include styrene, brass, steel, aluminium, resin and carbon fiber. The six cylinder engine, and all six tires were all cast in resin. Two AC kit frames were used and were fishplated like the original truck. The ends of the two four yard barrels were modified from kit parts, while the electric motors, the chutes and all other framework was scratchbuilt. The paint is Krylon semi gloss hunter green, the 'cement' is Tamiya body putty and the dust and dirt is done with weathering powders. The figure is added to provide relative scale to the massive size of the truck.
The Boulder Dam Mack was mostly scratchbuilt, with very few (modified) parts were used from the Monogram Mack AC kit. Scratchbuilt parts include styrene, brass, steel, aluminium, resin and carbon fiber. The six cylinder engine, and all six tires were all cast in resin. Two AC kit frames were used and were fishplated like the original truck. The ends of the two four yard barrels were modified from kit parts, while the electric motors, the chutes and all other framework was scratchbuilt. The paint is Krylon semi gloss hunter green, the 'cement' is Tamiya body putty and the dust and dirt is done with weathering powders. The figure is added to provide relative scale to the massive size of the truck.
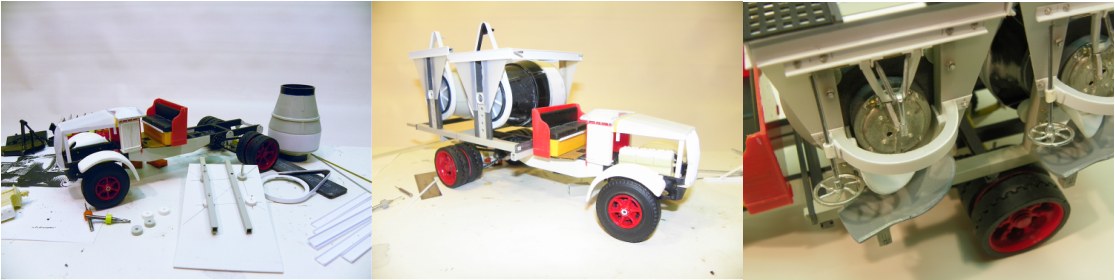
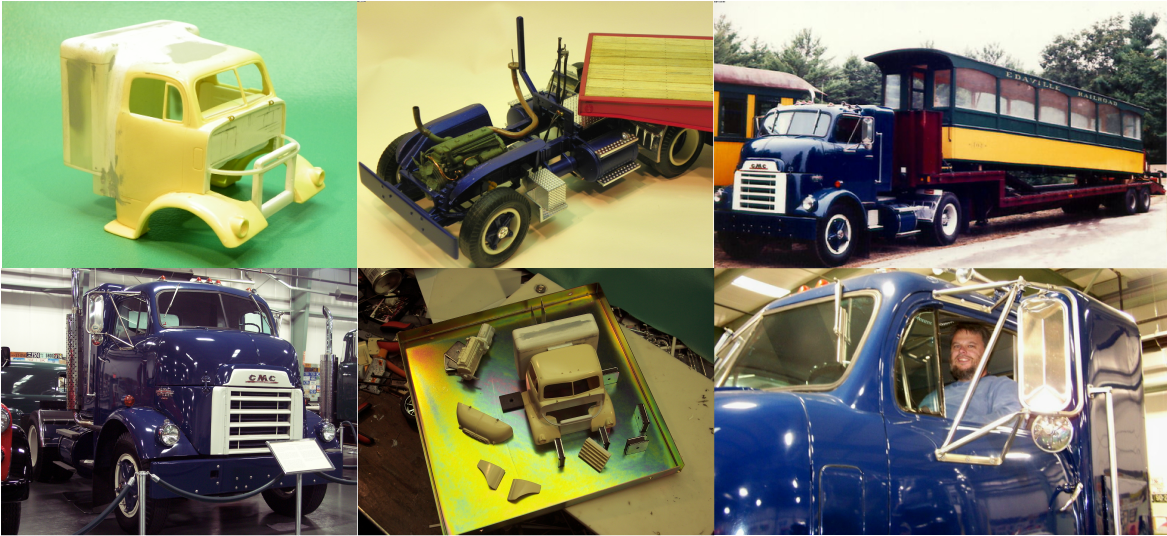
1955 GMC Cannonball 860 with Edaville Railcar
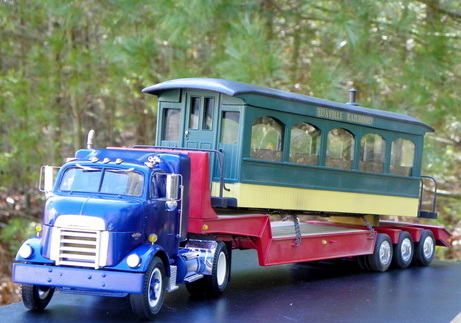
This project started a few years ago, as part of an ATEAM project to replicate some of the trucks at the Golden Age Museum, in CT. ( now closed ) I wanted to build the GMC Cannonball because it was a classic cab-over, but also because it was involved in the ‘The Great Train Robbery’ where all the rolling stock from Edaville Railroad in Carver was hauled back to Maine, in a massive convoy of antique trucks. The Golden Age Cannonball was part of that convoy.
I began with a Keith Sorci resin daycab, and the frame from a GMC Astro. I had to replicate the small factory sleeper of the real truck. After getting that to look right, I cut open and hinged the three hoods on the cab, and a resin 671 Detroit Diesel was stuffed under the cab. I purchased a ‘G’ scale railroad car to use as a base for the Edaville car and had to narrow and shorten it quite a bit. The worst part was converting the two tier roof into a single unit. I made arches to convert the side windows to the proper shape.
I began with a Keith Sorci resin daycab, and the frame from a GMC Astro. I had to replicate the small factory sleeper of the real truck. After getting that to look right, I cut open and hinged the three hoods on the cab, and a resin 671 Detroit Diesel was stuffed under the cab. I purchased a ‘G’ scale railroad car to use as a base for the Edaville car and had to narrow and shorten it quite a bit. The worst part was converting the two tier roof into a single unit. I made arches to convert the side windows to the proper shape.
2005 SSR with matching Teardrop Trailer

Okay it may seem that this one does not fit the theme described above. But I actually own a 2005 Chevy SSR and wanted a replica of my truck. My truck has a factory extra cost color shifting paint called Aquablur metallic. While it is blue most of the time, a lower angle of the sun will make it appear almost green in color, with purple highlights at certain places.
The model was built basically box stock, except the kit lacked the running boards found on most of these trucks, so those were scratchbuilt. I went through 4 bodies trying to do the paint scheme before getting it close to acceptable.
The Teardrop Camping Trailer was inspired by a fellow SSR owner who had a typical teardrop trailer that was painted to match his truck. I took the theme one step further and crafted my trailer from another SSR body.
1964 GMC Crewcab Railroad Maintenance Truck
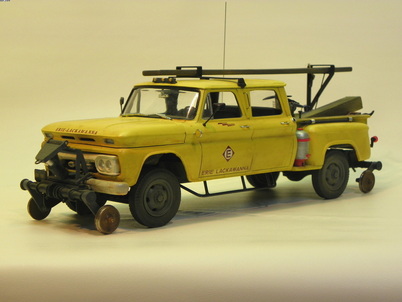
The inspiration for this truck was a picture found of a similar truck in the American Truck Spotters Guide. The model is truck is based on a resin cab from RMR Resin, and the parts from the Revel kit. The GMC grille is a modified Modelhaus resin item, narrowed to fit the cab. Two frame units were used to match the longer cab.
The Hi-Rail conversion is scratchbuilt, with the rail wheels sourced from the local hobby shop, from smaller scale train. The rail wheels can be raised up and lowered by hand. All kinds of tools and equipment fill the bed of the truck.
GMC’s of this era did not use Chevy straight 6's, but had their own unique 305 cu.in. V6 engine. ( yes 305 V6 ) The engine valve covers have a W shape, like a Chevy 348 or 409, and were scratchbuilt. The basic block from the larger 1/20 scale Lindberg 1/20 4.3 liter V6 was used for the basis of the engine.
1917 Mack AC Cemetery Truck
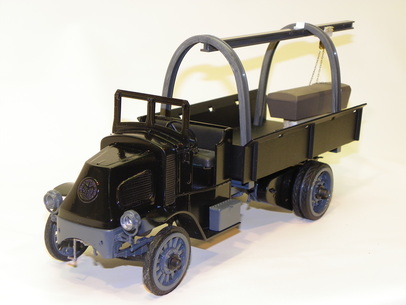
This was actually a quick build project to highlight a few parts I had mastered for Dave Natale at A.I.T.M. I created a new set of wooden artillery style front and rear wheels to replace the later cast iron wheels. The stock louvers from the 1926 kit were replaced by the earlier screen sides. Also the cowl is completely different with its rounded corners and screen sides.
Although not specific to the earlier truck, I also made a set of chain guards that were used on some trucks, as they were used to quiet the chain drive. I figured that would be the ticket for a cemetery truck.
The coffin came from the Dark Shadows kit and the arch shaped gantry was scratchbuilt. A chain hoist was added and it can slide along the I-beam to move items in and out of the truck bed. The truck is not overly detailed, as it was intended to be a quick build. Paint was semi gloss black and grey and just a light touch of weathering was used.
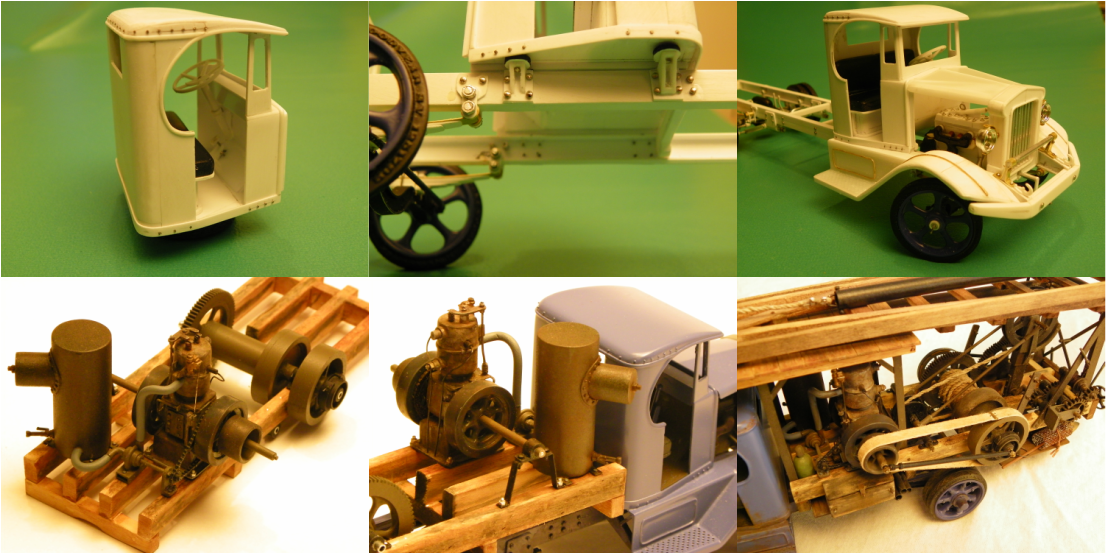
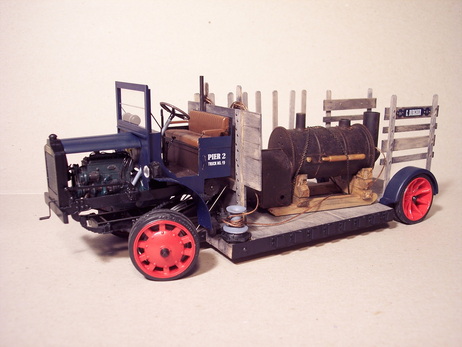
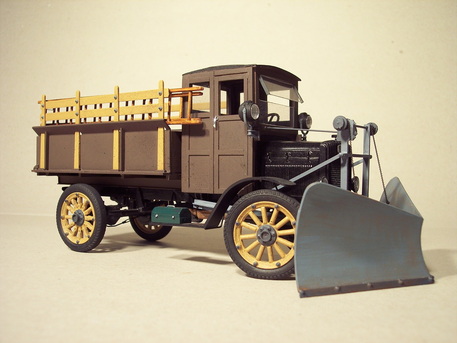
1926 GMC K-72 Big Brute with 1917 Sanderson Cyclone Well Drilling Rig
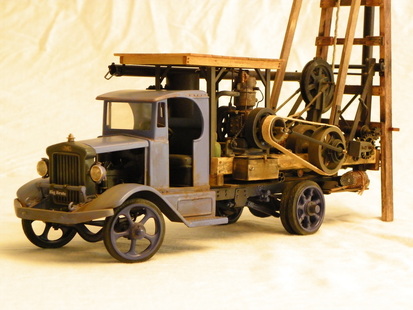
This truck was built to be a replica of the actual truck sitting at the Drake Oil Museum in PA. It also fit into my "grand scheme" to build a GMC truck out of every decade. The 1:1 truck was bought used in 1931 and outfitted with the older well drilling rig. It was in service until the early 70's! Although the model is heavily weathered, the real truck is currently in much worse shape.
Almost everything on the truck was scratchbuilt. The only kit parts are the rims and tires (all the smaller fronts) from the Monogram AC Mack kit. I modified the rear 40" rims to use the smaller 36" tires. The one lung 'hit and miss' engine drives the big belt on the side. Turning the leather belt will actually make the drill bit oscillate up and down. The derrick folds down on top of the platform over the cab for over the road travel. Paint on the cab is Krylon semi-gloss periwinkle blue, while the frame and rims were shot with a darker shade of blue.
Almost everything on the truck was scratchbuilt. The only kit parts are the rims and tires (all the smaller fronts) from the Monogram AC Mack kit. I modified the rear 40" rims to use the smaller 36" tires. The one lung 'hit and miss' engine drives the big belt on the side. Turning the leather belt will actually make the drill bit oscillate up and down. The derrick folds down on top of the platform over the cab for over the road travel. Paint on the cab is Krylon semi-gloss periwinkle blue, while the frame and rims were shot with a darker shade of blue.
1962 International Metro TV Repair Van
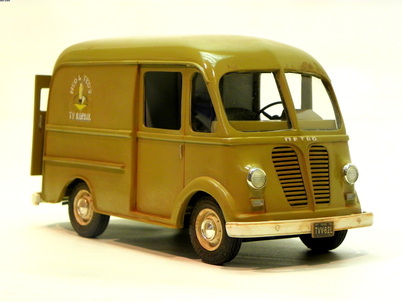
This 'fast-track' build was done in 4 weekends. Pratically a record for me. I wanted it done for the Resins/Vans theme at NNL East. It all went together fairly easy, for a resin kit. I believe the frame was based on the Monogram 37 Ford truck, so I used the axles, tires and rims from that kit. I built up a Chevy
straight 6 from the 1941 pickup and painted it silver to represent the IH Silver
Diamond 6 used in these Metros.
I building the metal shelving in the rear, it was a bit of a pain. They were quite delicate and I had to modify them once they were installed to fit the inside of the van. I filled the shelves with a few TVs, testing tools, a tool box and a box of TV tubes. I also made an aluminum TV antenna, in its folded up position, ready to haul up onto some roof. I put 1966 plates on this worktruck, so its had about 4 years on the road, its not beat up or dented, but it is dirty, and showing a little bit of rusty residue around the edges.
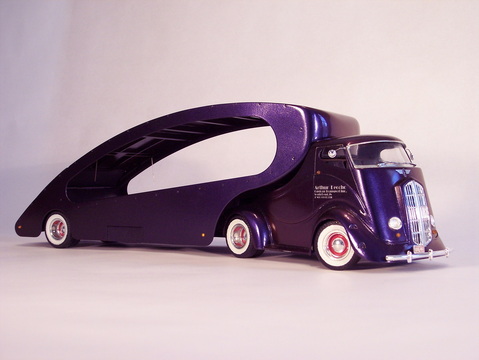
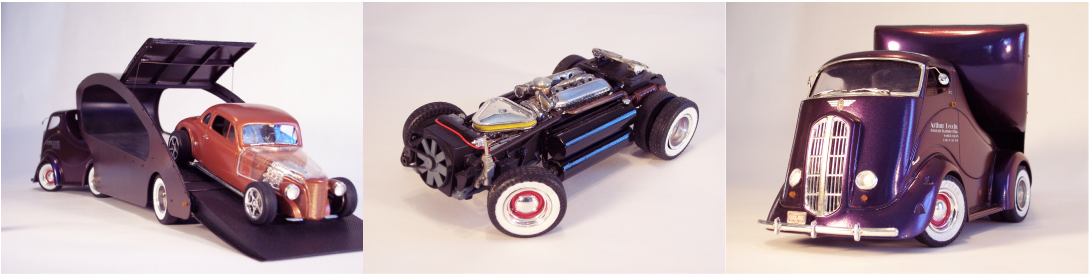
1937 Cord Service Truck
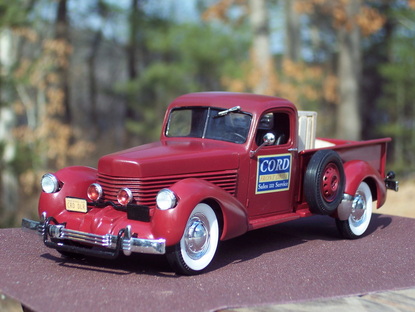
The inspiration for this model began years ago, and the first start was with the Monogram '40 Ford pickup, but I was never happy with the way it looked. After finding the vintage CORD dealer sign I got the itch to try it again.
This time I used the '41 Chevy cab as a start, and things came together a bit easier. My backstory is that it was built by the Cord Dealer to service cars sold from that shop. During the 're-construction' the original V8 was replaced with a Lycoming experimental V12. And twin side mount spares provided easy replacement for a motorist in need.
Since you almost never see a Cord with the headlights rotated into the out position, I figured this was the perfect chance to do so. An AMT '53 Ford gave up its tailgate for the project, I shaved off the 'F', made a casting of the O, and then cut a section out of it to create the "C" I needed to replace the F on the tailgate.
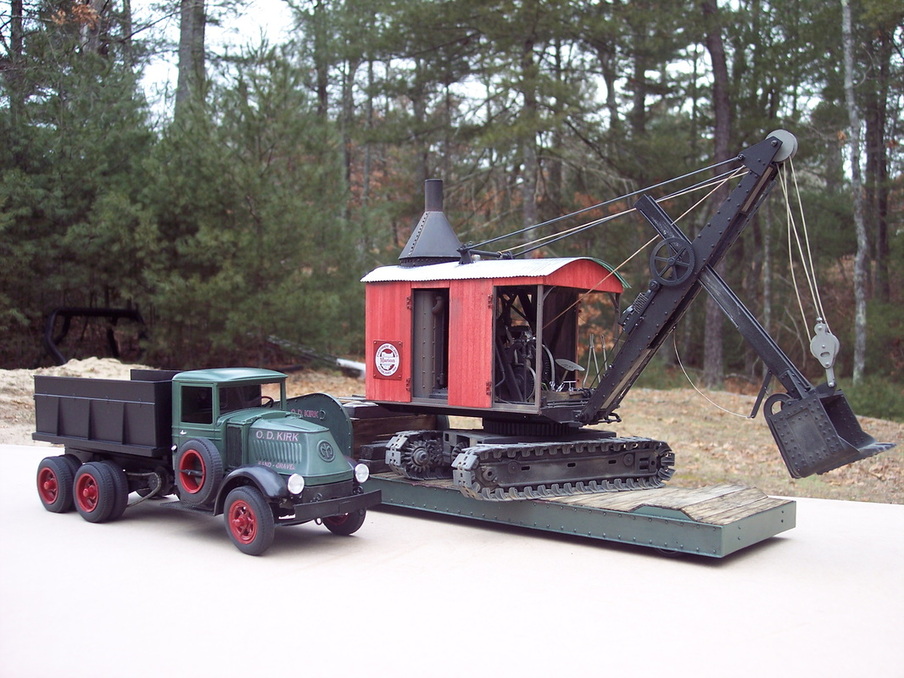
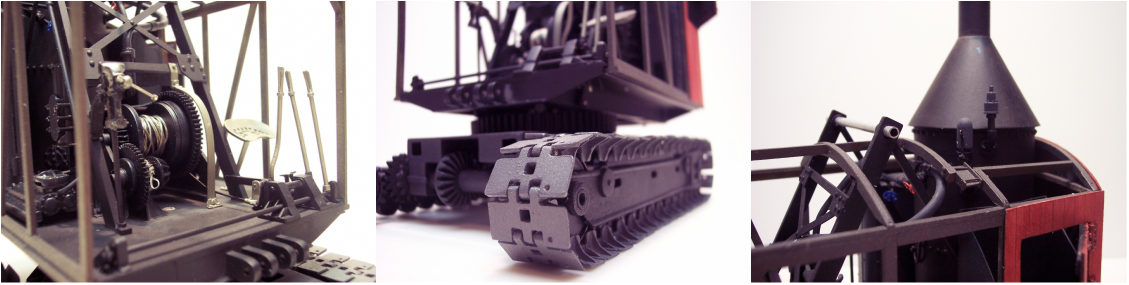
Marion Model 21 Steam Shovel, with Rogers beavertail style trailer, and Mack AK 3 axle Dump Truck
These pictures show the basic construction of my vintage Marion 21 Steam Shovel. No kit parts were used in the creation of this model. Some aftermarket white metal detailing pieces were used, as well as some RC car gears. Other gears used came from old digital clocks and electric meters. Build time was about 30 months. I searched for reasonable looking tracks forever, but found nothing. I finally had to scratchbuild one track link, and it was comprised of 15 pieces. I resin cast almost 100 in order to get 64 good ones for the tracks. Each track consisting of 32 separately cast track links and 32 common pins. The last shot shows the basic mechanicals just prior to painting.
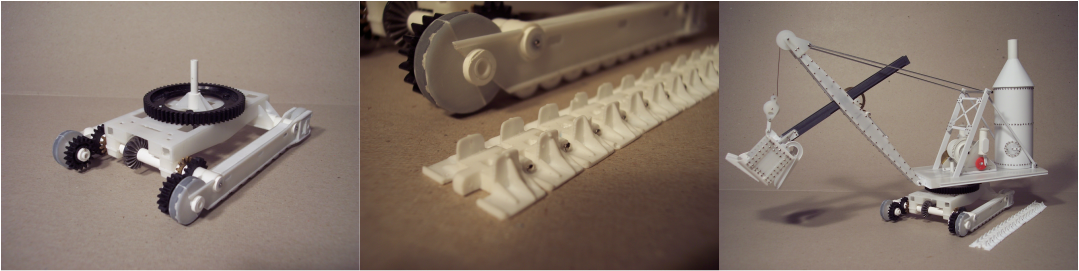
Although the real house frame was made of wood, I built mine from plastic strip. I knew there would be multiple test fits and flexing, so each glue joint was drilled and pinned. The base of the frame for the house was made with an upside-down 'T' shape, and slid into a sideways 'H' shape on the chassis. This way I could slide the house on and off, as more parts were added and test fit. The boiler and other plumbing was added using a reproduction Marion manual. Real wood sheathing was used on the house, and was stained using thinned down Floquil paint. I used a series of Rustoleum brand texture paints on most of the surfaces, which holds the weathering chalks very well.
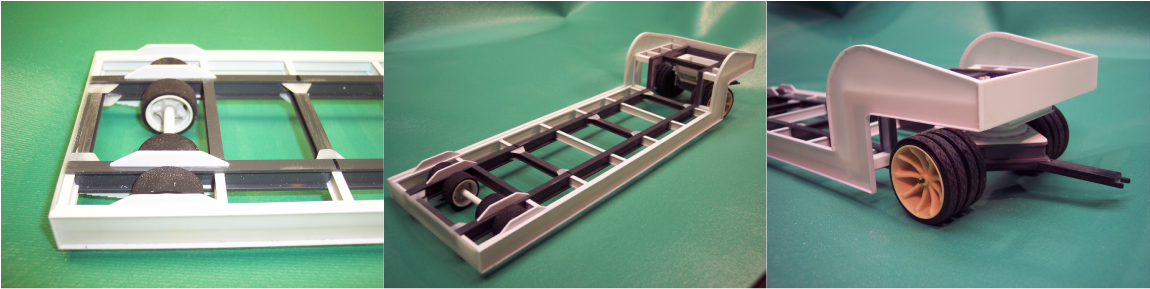
As the shovel neared completion, I needed a trailer to haul it with. I had a number of pictures that showed a 'beavertail' style trailer, and eventually found a reproduction brochure from Rogers Trailers of about the right vintage. The basic construction was straight forward, but all the tires had to be the hard rubber style. For the fronts I used 4 rims I resin cast for the rear wheels on my MacDonald truck, and used those on the front. For the small diameter rubber under the beavertail I used some low profile rubber from a Tamiya kit and sanded off most of the tread. Then I used balsa wood for the decking on the trailer.
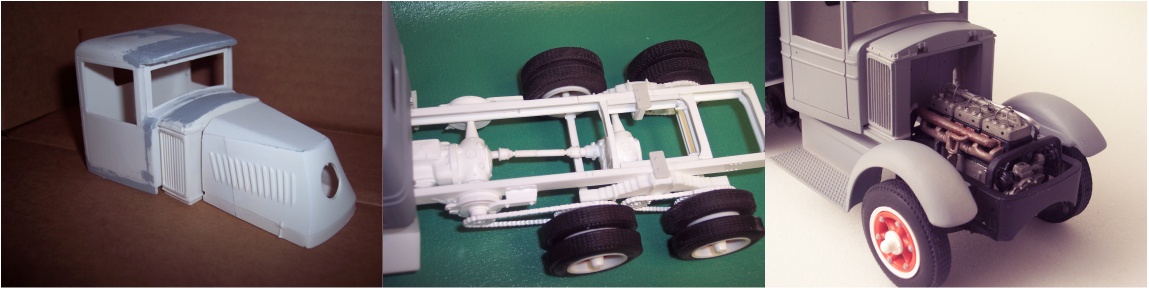
The last piece of the puzzle was what truck to use. I originally wanted to use the GMC Big Brute, but after finding the well drilling rig that was out of the question. The AC Bulldog could be used, but a variant would be even better. I decided to build the AC's big brother the AK. This was a 6 cylinder truck instead of a four, had dual chain drive axles, a longer hood and a bigger radiator. Also instead of the typical C cab or open cab, I decided to do the optional closed Coupe Cab, based on a heavily modified Autocar cab. I created masters and cast the new 6 cylinder engine as well as the separate heads. This engine would also be used later in the Boulder Dam AP Mixer.
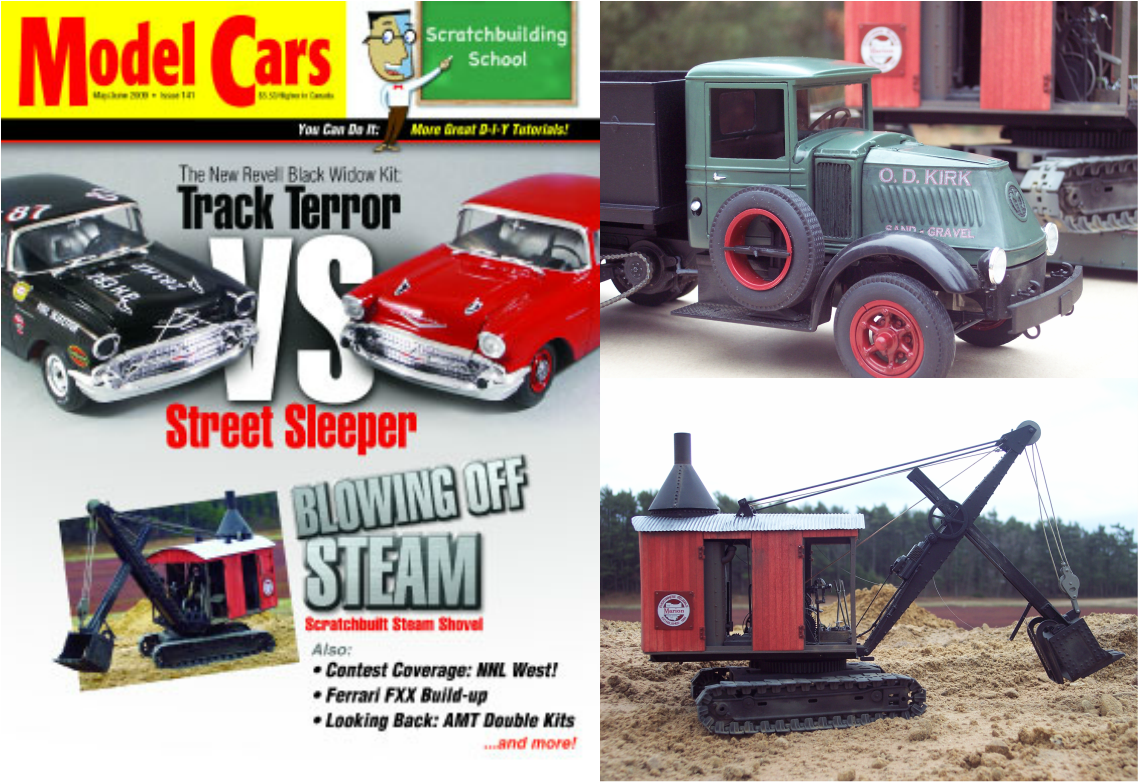
During the final construction of the truck, I learned of the passing of fellow modeler, Tex Ouderkirk. And although we were not close friends, I decided I wanted to to remember him in a special way with this truck. I decided to letter the truck and trailer with the name O.D. Kirk, something that wasn't overly obvious to non-Masscar members, but those in the club would know why it was lettered the way it was. This three model combination was a long time coming, about two and a half years, but it was really worth it. And the Marion Model 21 Steam Shovel turned out to be the first magazine cover I have ever earned for one of my builds, as it appeared on the cover of the May/June 2009 issue of Model Cars.
Custom Cabover with Trailer
I built the 'Custom Cabover' so I could enter a truck Mark Gustavsons' Custom Clinic Contest in Scale Auto. It actually did better than I expected, and earned a 7th Place overall, and a picture in the magazine, with Mark calling the design "well integrated".
Heres' the list of 'stock' model parts that were integrated into my custom. The four fenders came from a 1/16 scale VW, shortened and turned backwards, the windshield is from the ALF fire truck, the grille is two '55 Chevy pickup grilles, faced bottom to bottom and turned on end, the headlights are Avanti units turned 90 degrees. I drew out the trailer design with the large open sides, I though of making opening glass windows on each side but never did it. The nose of the trailer was a huge pain, as I laminated multiple layers of styrene and carved the shape with a belt sander. Power is provided by a parts pack Allison V-12, and the engine is flanked by two fuel tanks on each side, outboard of the frame.
Heres' the list of 'stock' model parts that were integrated into my custom. The four fenders came from a 1/16 scale VW, shortened and turned backwards, the windshield is from the ALF fire truck, the grille is two '55 Chevy pickup grilles, faced bottom to bottom and turned on end, the headlights are Avanti units turned 90 degrees. I drew out the trailer design with the large open sides, I though of making opening glass windows on each side but never did it. The nose of the trailer was a huge pain, as I laminated multiple layers of styrene and carved the shape with a belt sander. Power is provided by a parts pack Allison V-12, and the engine is flanked by two fuel tanks on each side, outboard of the frame.
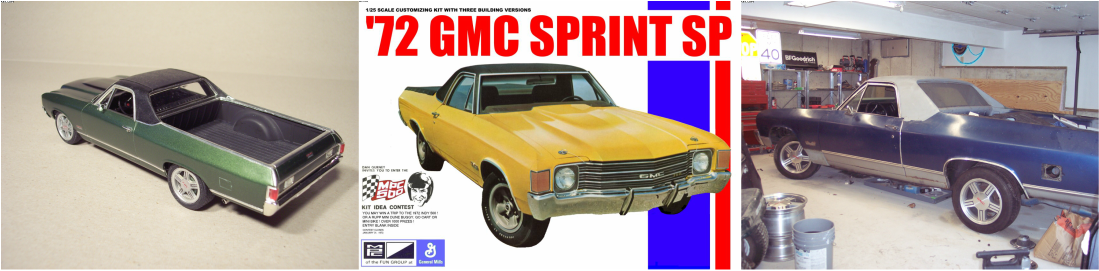
1972 GMC Sprint

I built this model because I have a 1:1 '72 GMC Sprint in my garage. It was originally born Sequoia Green, and I want to return it to that color eventually. I envision it would have a black interior, black vinyl roof , black stripes on the hood, and black Rhino lining in the bed. Although I had a set of 15" Rallye wheels on it for a while, I decided the 16" GMC Sonoma ZRQ alloy wheels looked really cool, and carried over the GMC theme.
This model was quite a bit tougher to build than it looks. To get the right look I had to graft a original '72 Chevelle nose to the new '68 ElCamino kit. All of the GMC emblems were reproduced with decals except the one in the center of the grille. The real trucks' SB400/TH400 powertrain was duplicated for the model.
I also did a phantom box top to display with the model. I used a real 1972 MPC issue to duplicate the box layout, and the illustration for the cover comes from the cover of the 1972 GMC brochure I have.
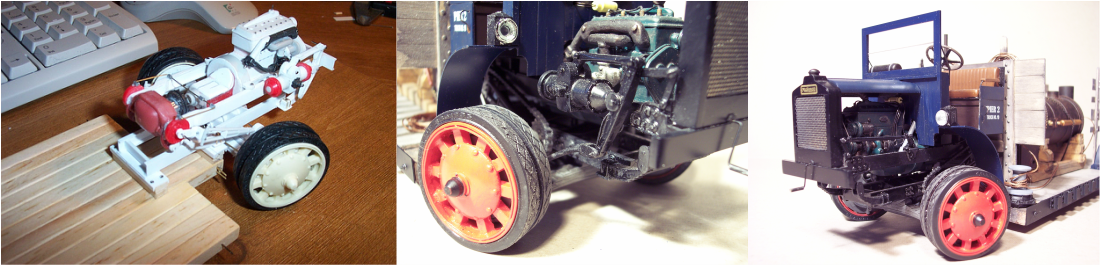
1920 MacDonald Model O Lowbed Truck
MacDonald trucks were built in California for use around the docks. I believe there is one known surviving example in the Hays Museum and that is the one that Al Armitage drew detailed drawings of. These drawings were published in a railroad magazine, and once I found those plans, I was on my way.
Even though this truck was built in 1920, it had front wheel chain drive and hydraulic power steering. It had 3 frames, one for the engine and the cab, one for the front suspension and the huge timber frame to support the heavy loads it hauled. When I got stuck on the assembly of the front axle and suspension, the museum was nice enough to take a few digital photos and send them to me.
Both the front and rear rims were scratchbuilt to accept the hard rubber tires from the Monogram AC Mack. The seat was modified from a Revell VW bus, most everything else was scratchbuilt.
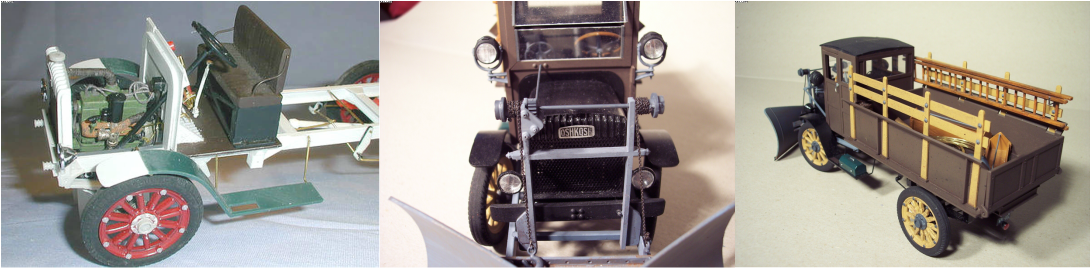
1918 Oshkosh Model A Line Truck with Plow
This is a model of the very first production truck from Oshkosh. This is also the first model I ever built to have a feature article done in Scale Auto Magazine. I made line drawings of this truck before starting any other work. The wheels and tires came from an unidentified larger scale early model and I was on my way.
This was also one of the first models I built with a fair amount of brass and aluminum parts. I also made the plow able to raise and lower using the hand wheel in front of the passengers position. Two gears were used to adjust the height of the plow, via a pair of chains.
The bed was modified from the Monogram AC Mack, and was filled with all the tools and supplies need to do line and pole work back in the day. Although not pictured here, I built a 'dinky' trailer that gets chained to a utility pole and attaches to the pintel hitch on the rear of the trucks frame.
1950 Sterling Truck (under construction)
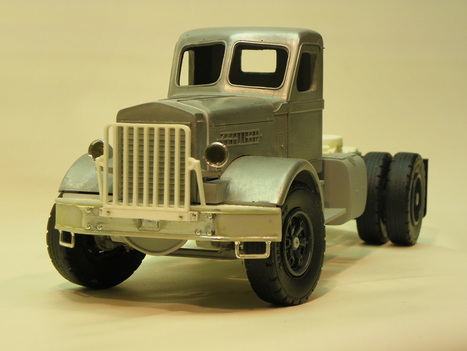
This classic will end up as a 6 wheel tractor used to haul a trailer